Bolt Tensioning: An Overview
Hydraulic bolt tensioners more commonly used for bolting applications in Europe than the United States. You’ll typically see hydraulic tensioning used on fasteners with 2″ bolt diameter or greater, but they can operate on studs as small as ¾” bolt diameter.
Tensioners are common in subsea (both topside and underwater), wind turbine, and power generation applications, but are less frequently used in the oil & gas industry. Within the oil & gas industry, however, a good use of tensioning tools is on fasteners in critical bolted joints such as heat exchangers and other large pressure vessels.
When you use 50% or greater tensioner coverage, you can achieve more even and accurate gasket compression than when you use one (or even 4) torque wrenches.
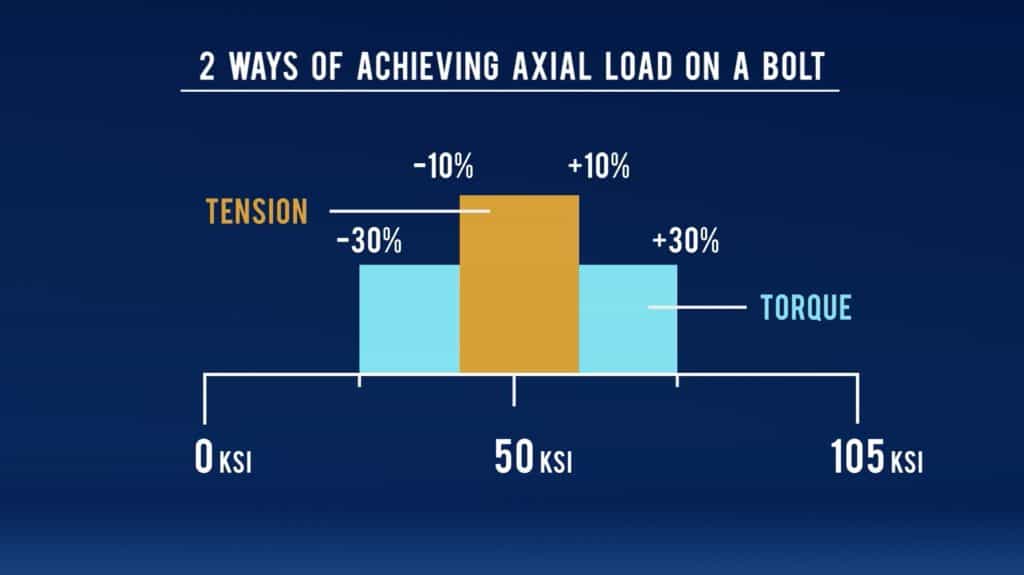
One of the main advantages of stud tensioners is that they eliminate the friction factor (or k-factor) on the stud and nut face. In fact, tensioners are more accurate in general, achieving a plus-or-minus 10% accuracy rating compared to 30%.

It is typically stated that you can also reuse stud bolts more frequently when you’re using hydraulic bolt tensioners, since you don’t have to worry about galling or any frictional forces on the fastener. While this is true in laboratory applications, be aware that in the field, you have to take into account operating conditions like temperature and pressure, which will affect the fasteners over time.
Using Bolt Tensioners in the Field
One limitation of tensioners is the need for greater spacing. While this typically isn’t an issue on normal piping flanges, you might not have enough space for a tensioner on valves and other custom flanges like you’ll see on heat exchangers.
Also, the maximum fastener stress that tensioners can achieve is normally around 50,000-60,000 psi of stud preload. If you plan on tensioning to more than 60,000 psi, you’re probably going to need a specialty tensioner.
You also need additional stud length for tensioning. The rule is you need one diameter of the stud sticking above the nut so that the puller bar can grip the stud when the load cell presses on it. Therefore, to calculate the proper size, you take the normal stud length you would use for torquing and add on another diameter of that stud to it.
Do not use washers with tensioners. The footprint of a tensioner can sit on the washer, bow it up, and the tensioner gets locked on as a result.
Another disadvantage of tensioners is they don’t do well in elevated temperatures. What does that mean? Well, the startup re-torques you might ordinarily do are fine with torque wrenches, but tensioners can’t be used that way because the seals will blow and won’t hold the pressure. So with tensioning, you can assemble the flange at ambient temperatures just fine, but after startup you can’t go back and do what some people call a “hot tension pass”.
NOTE: There are other bolting tensioning tools such as hydraulic nuts that we do not discuss in this article.
How Hydraulic Tensioning Works
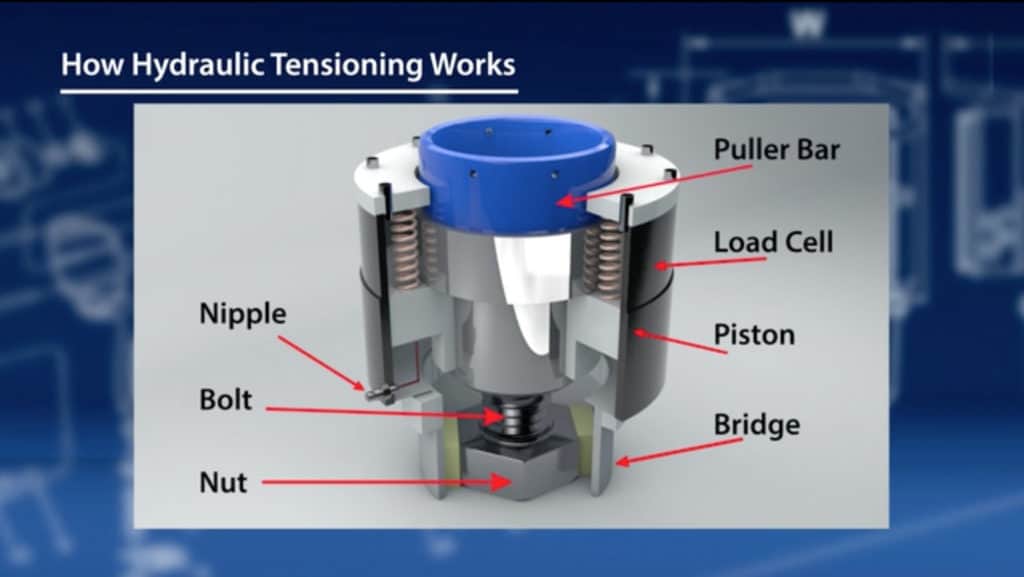
Starting from the bottom of the unit, the basic parts of a hydraulic tensioner are:

Nut: This sits on the flange, while the bridge sits around the nut. As you can see, the bolt protrudes through the nut, and you need to make sure that you have one diameter of that stud sticking above the nut.
Load cell: This sits above the nut, and has the hydraulic piston inside of it. Attached to the load cell is a nipple for oil to come in at a designated hydraulic pressure from the tensioner pump.
Puller bar: This sits on the piston, which is threaded onto the stud. The hydraulic pressure in the pump and the diameter of the load cell determines how much force you’ll exert on the bolt.

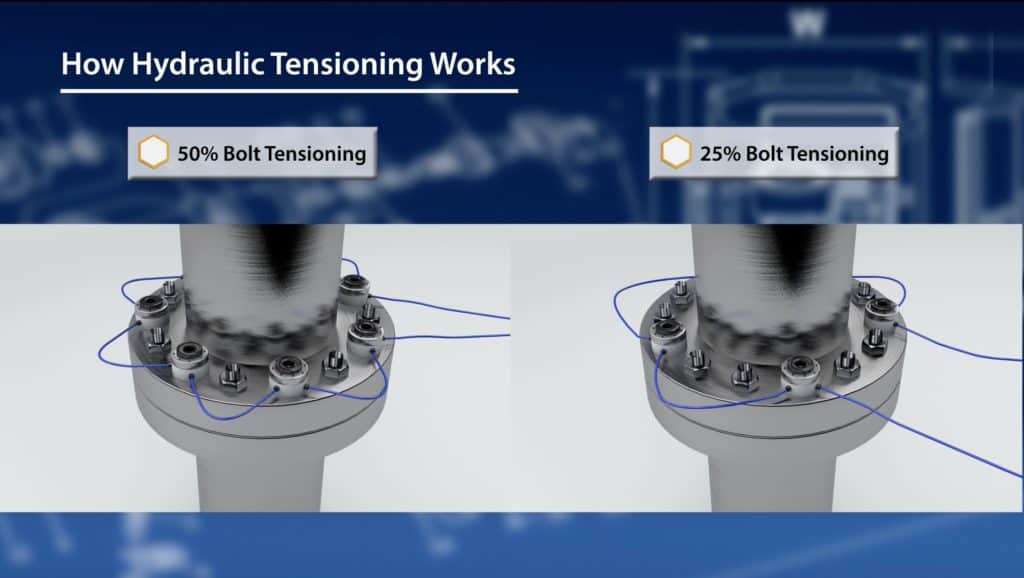
50% coverage (shown above, left), or one tensioner on every other bolt, is standard. While it’s possible to do 25% coverage (above, right), we don’t recommend this approach because it requires more passes, is harder for the assembler to execute, and your accuracy starts going down. Therefore, when you have 50% coverage, you’re going to have what we call an A pass and a B pass.
BOLT TENSIONING EXAMPLE: Let’s say your target is 50,000 psi bolt stress. First you need to consult with the tensioner and the engineer to make sure you have all your load loss factors figured out. But for this example, you’re going to tension your A pass 20% above what you would do your B pass. Your B pass is your final bolt load. But because we’re only putting load on half the bolts and we’re trying to bring this pipe together and compress the gasket and everything else, we actually kind of have to go over what our target is so that when we bring our B pass in, the load transfer is going to happen and it should equalize out. Now a common practice is to go back to your A’s and just double check that you still have the correct bolt load on there and do your B pass on your A’s.
Hydraulic Tensioning Safety
Safety around hydraulic tensioning is absolutely important. Your primary concern is that you are working with high pressure hydraulic fluid, which goes from the tensioner pump to the load cell and then on to the other tensioners. A high-pressure fluid can cause massive injury, so always ensure that proper storage, cleanliness, and safety measures are taken prior to use. If you see a worn or damaged hose or fitting, please replace it.
Additionally, your assemblers don’t want to be looking down at the tensioner while it’s in use, because if it pops off because of insufficient thread engagement, stripping, or anything else, it ends up being a bullet. So you always want to make sure you’re on the side of the tensioners, and not looking straight down at the puller bar.
Learn more safety considerations for all hydraulic equipment.
Maintenance, Troubleshooting, and Calibration
Seals are the most common culprit for issues with a hydraulic tensioner. Just like with hydraulic torque wrench pumps, if you have oil, dirt, or any other gunk running through the hydraulic fluid, those impurities will get into the tools and eat away at the seals, which are then the first things to go.
Outside of the seals, hydraulic tensioners don’t require a ton of maintenance. The only other big troubleshooting tip is if you’ve got a tensioner that is not working, you need to check your couplers.
For calibration, all you’ve got to do is make sure the gauge was calibrated within the past 12 months.
Well-trained assemblers produce far more accurate results. Learn how a U.S. refinery achieved more consistent flange makeup.
Join Industry Leaders!
Subscribe to Hex Technology today and we’ll give you $700 in bolting courses, FREE. Your path to a safer, more reliable, more profitable site starts here.


